


Customer Training
Feed Error Clearing Procedures v1.3
Auto Start Failure
IMPORTANT: Do not use any tools or sharp objects when performing any of these steps
1. Remove all notes from the top hopper and bottom stacker tray
2. Turn the machine around and turn off the power and unplug the power cord.
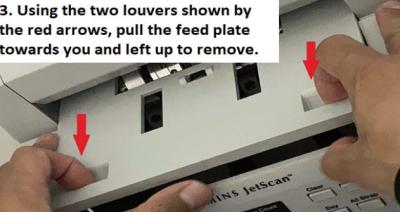
3. Remove metal hopper extension and feeder plate
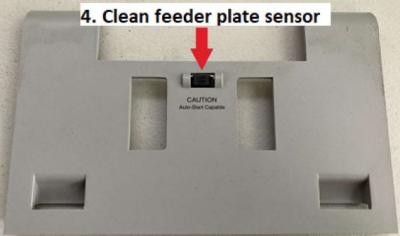
4. Clean feeder plate sensor with Simple Green Safety towel
5. Replace feeder plate and metal hopper.
Totals Adding with "Add" fuction not selected.
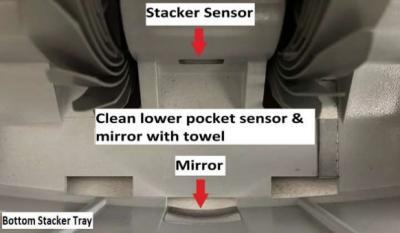
- If the Pocket count limit is reached, the sreen will display "Stacker Full". Clean lower pocket sensor & mirror with a dry towel.
- Clean lower pocket sensor & mirror with a dry towel
6. Power on the machine and test

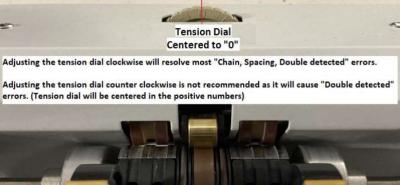
Chain. Spacing, and Double Detection Errors
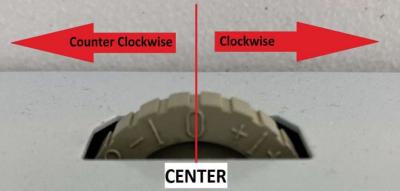
- Error messages such as " Chain, Spacing,and Double Detected", can be correted by adjusting the thickness tension dial.
- Adjusting this dail clockwise will tighten the gap and help reduce "Chain Detected" errors.
- Adjusting this dial counter clockwise will resolve most "Chain, Spacing, and Double detected" errors.
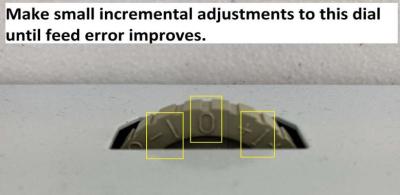
- Make small incremental adjustments until feed errors improves.
- Test with notes. Repeat step and test until it improves.
Jams
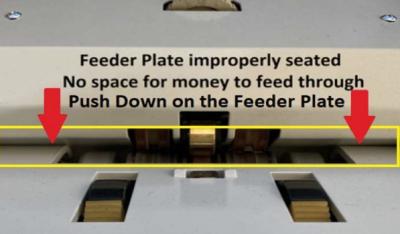
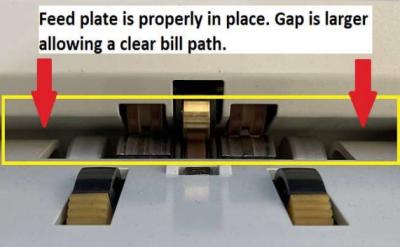
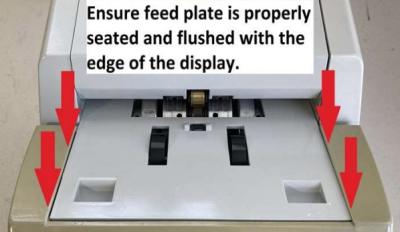
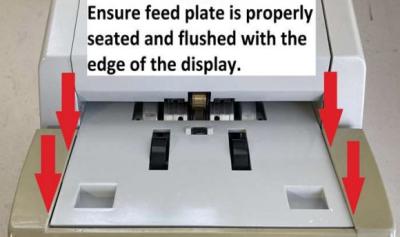
Feeder Plate Improperly Seated.
Oring off track (Easy to identify). Call for service if oring is missing.
1. Remove all notes from the top hopper and bottom stacker tray
2. Power off machine & unplug power cord
3. Remove metal hopper extension and feeder plate
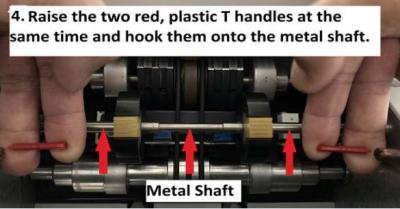
4. Raise the two red, plastic T handles at the same time and hook them onto the metal shaft.
7. Lower the two red, plastic T handles.
8. Replace feeder plate and metal hopper.
9. Power on the machine and test.
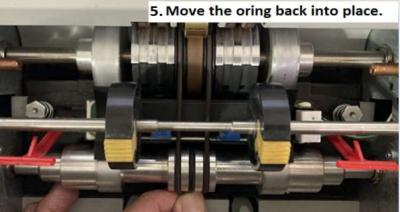
5. Move the oring back into place.
6. Using the large black feed roll, slowely roll downward until oring is back in position.

7. Lower the two red, plastic T handles.
8. Replace feeder plate and metal hopper.
9. Power on the machine and test.

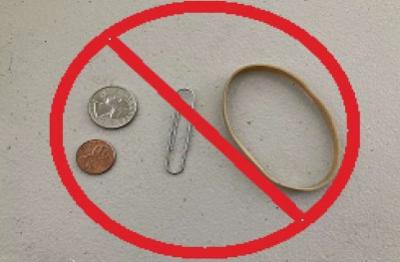
Jams Caused by Currency or Foreign Object
IMPORTANT: Do not use any tools or sharp objects when performing any of these steps
Steps for Clearing Currency or Foreign Object
1. Remove all notes the top hopper and bottom stacker tray
2. Turn the machine around and turn off the power and unplug the power cord.
3. Remove metal hopper extension and feeder plate
4. Visually inspect and locate the jam.
5. Raise the two red, plastic T handles at the same time and hook them onto the metal shaft.

6. Inspect the bill path by manually rolling a note through the machine.
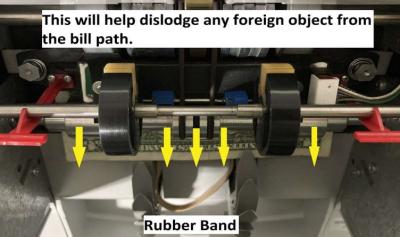
7. If a jam is present, move jammed notes forward/back by manually rotating the large, black feed rollers until jam is clear.
8. Lower the two red, plastic T handles.
9. Replace feeder Plate and metal hopper.
10. Power on the machine and test.
Note: Contact Cummins Allison if you are unable to clear jam.
Scan the QR code on the machine to access the virtual instruction page.